How does your media product represent particular social groups?
Thursday, 22 March 2012
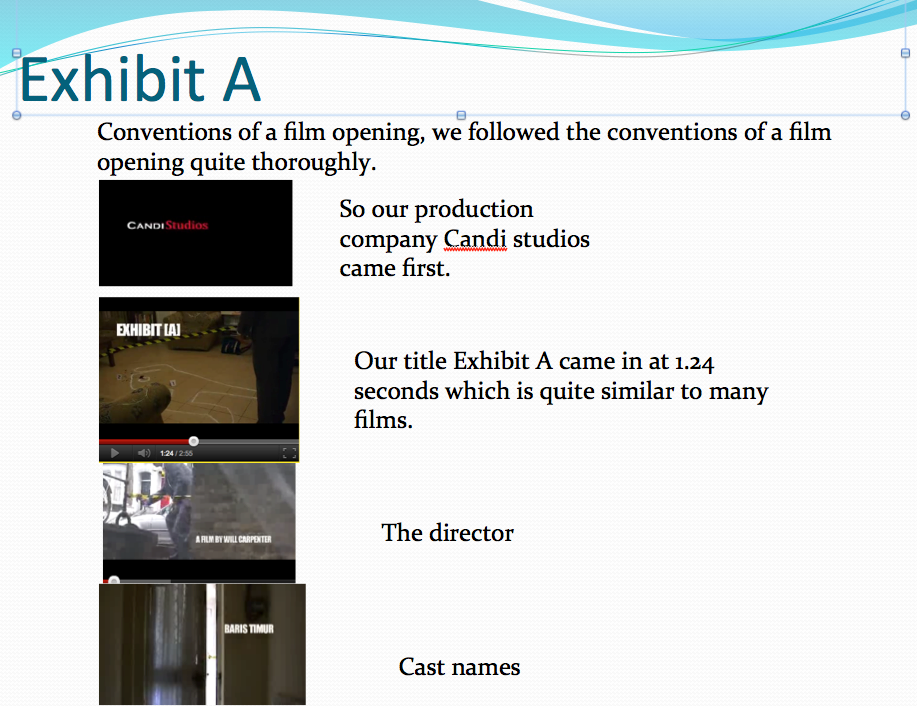
Question 1
In what ways does your media product use, develop or challenge from and conventions of real media products?
Question 1
i used the website go animate to make this.I could really get used to using that website lol
Question 7
Looking back at your preliminary task, what do you feel you have learnt in the progression from it to the full product?
Monday, 19 March 2012
Question 1
In what ways des your media product use, develop or challenge from and conventions of real media products?
Question 1 on Prezi


Question4
Who would be the audience for your media product?
GoAnimate.com: Queston 4 by nadia101
Like it? Create your own at GoAnimate.com. It's free and fun!
GoAnimate.com: Queston 4 by nadia101
Like it? Create your own at GoAnimate.com. It's free and fun!
Q2: How does your media product represent particular social groups?
Representation refers to how you present someone for example a persons age, ethnicity,gender, class, status, ability, disability and sexuality.
In our thriller our victim is wearing a hoody, one could assume that this means that she is the stereotypical teenager. You may also make the generalisation that crime only happens in the lower class.

Compared to the victim wearing a hoody, the detective is seen wearing a suit. This may show that the detective is of a higher class with a better job.

Camera angles
Low angle shots were used when filming the detective to show that he's superior and he's dominating both the scene and camera.

We may have represented lower class females in a negative way as she played the victim, which could suggest that females are always the victims. Also the clothing of the victim suggests she is quite young therefore people may assume that crime amongst young people is higher then any other age group. This is similar to the TV series Misfits, when a group of youths are shown carrying out community service because they have taken part in criminal activities.
However middle class men are presented in a positive light as he is seen in the better clothes and the person with a better job.
We were aiming to imitate Crime Scene Investigation.

In our thriller it seems as if the one male detective is out to solve the crime alone, which may reflect on the power men seem to think they have in society today. Also as you can see in the above picture there are only 2 girls and 6 men which shows how male dominated work forces such as police officers are.
In our thriller our victim is wearing a hoody, one could assume that this means that she is the stereotypical teenager. You may also make the generalisation that crime only happens in the lower class.
Compared to the victim wearing a hoody, the detective is seen wearing a suit. This may show that the detective is of a higher class with a better job.
Camera angles
Low angle shots were used when filming the detective to show that he's superior and he's dominating both the scene and camera.
We may have represented lower class females in a negative way as she played the victim, which could suggest that females are always the victims. Also the clothing of the victim suggests she is quite young therefore people may assume that crime amongst young people is higher then any other age group. This is similar to the TV series Misfits, when a group of youths are shown carrying out community service because they have taken part in criminal activities.
However middle class men are presented in a positive light as he is seen in the better clothes and the person with a better job.
We were aiming to imitate Crime Scene Investigation.

In our thriller it seems as if the one male detective is out to solve the crime alone, which may reflect on the power men seem to think they have in society today. Also as you can see in the above picture there are only 2 girls and 6 men which shows how male dominated work forces such as police officers are.
Question 7
Looking back at your preliminary task, what do you feel you have learnt in the progression from it to the full product?
question 7 on Prezi
Q3: What kind of media institution might distribute your media product and why?
GoAnimate.com: Sabina begum question 3 by sabinabegum1
Like it? Create your own at GoAnimate.com. It's free and fun!
Like it? Create your own at GoAnimate.com. It's free and fun!
Friday, 9 March 2012
FINALY FINISHED!!!
Here we are FINALLY FINISHED!! After all our hard work we have finally managed to finish our final of EXHIBIT A. We can proudly say that we are happy with what we made and how it turned out. Even though it has been a stressfull process, weeks of planning and making has finally paid of. Now we just have to wait and see. :)
Reaction videos
One of our friends watched our film, so we could just see what she thought went well and what didn't. She generally liked the whole thing but was more impressed with the music! Which ironically was what we didn't like! But hey whatever pleases the audience!!
Final Stages of Editing- TIME

Target audience for Exhibit A

We've decided on the film certificate to be a 15 plus film. The reason for this is we took into consideration the age restriction Paranormal Activity used which was a 15. As our film was only the opening, thinking about how it would carry on throughout the film we expect it to be scary and so the age has to be suitable.
Talk to camera, almost done
This a short update on how were doing towards the end of our project. We've faced our biggest problem yet, which is finding the correct music. But we've decided on keeping the music we first chose. We double checked with the teacher for a second opinion and she seems to think it goes well. Time is against us at the moment so bye for now.
Final stages of editing - Foley Sounds
Here are some videos - talk to cameras from the boys (Baris and Tufael). They are working on the foley sounds for the opening of Exhibit A .
FINAL STAGES OF EDITING
Here are a couple screen grabs of the last stages of editing the music. Finding the correct sound is difficult when theres hundreds of sounds to choose from. Were layering lots of different sounds to keep up the pace. We chose to use intense sounds as it would build up tension throught out the opening. We needed foley sounds for the telephone so we did manage to find one that would go with our telephone scene and make it seem realistic. We added some sound for our flashback scenes as it would create tense also hint out some part of the story to the audience.


SKILLS AUDIT
To make our film there were different kinds of softwares we had to get familiar with first such as Final Cut Pro where we will do the actual editing for our film, Sound track Pro and other sites such as Blogger and Prezi.
Final Cut Pro
Final Cut Pro
- Import files into FCP and arrange them together
- Extend and cut clips also how to fine cut
- How to add titles when different fonts, sizes and we also learnt how to change the length of the title
- Exporting the video on to Quick Time movie as well as sound track pro, we had to export it on to Quick Time first to make sure we could upload it on to our blog
Sound Track Pro
- We learnt how to add non diegetic sounds into the video
- Explore and find non diegetic sounds into the video
- Importing them back onto FCP where we don't have a mixture of sounds.
Blogger is an essential part of our course, anything we learnt we had to keep a continuos update on our blog. We just log in, find our group number, go to our name and click on NEW POST!
Prezi was also to use, it was an upgraded version of powerpoint, whereby the initial us of it was the same, to create a presentation, but it had better effects and looked nicer!
Thursday, 8 March 2012
What i learnt
Tufael here, from the start of this project I have been learning a new set of things every time. In the first few lessons it was what a real film opening looks like and what we aim to do. i learnt what makes a thriller and the conventions of a thriller opening by analysing a few openings like Pelham 123, from this we briefly talked about the importance of the order of the title sequence, which I did not know was important.
After this the cameras were introduced to us although they were still cameras i learnt a lot, such as how much space is needed on top of the head when filming and positioning of the characters. Also how to position many shots correctly, such as over the shoulder, extreme close up, two shots, low angle and experimenting with lighting.
After this the cameras were introduced to us although they were still cameras i learnt a lot, such as how much space is needed on top of the head when filming and positioning of the characters. Also how to position many shots correctly, such as over the shoulder, extreme close up, two shots, low angle and experimenting with lighting.
Now the real camera’s came in! just like the still camera’s we were shown a whole set of techniques and shots to make what we film realistic, one of these was the 180 degrees rule, before we got to use the cameras, micky (a media teacher) showed us how to properly use the cameras in the correct way, this included showing how the tripod works, how to hold the camera and inserting memory cards.
Next when we chose a thriller clip to film ourselves, we chose collateral because we thought we could remake the shots very well and work well with it. Then we made a story board, this was one of our first story boards, personally I wasn’t good at drawing and neither were the others but we all still came up with ideas and Baris drew some good shots. In another lesson we properly filmed something for the first time, but before that we had to learn how to set the camera so that it would save the footage onto the first memory card, after a while I discovered how to and we began filming. I was filming and I had filmed before in the past, but with the new skills I learnt I put them to use and the footage came out very well and everyone was proud of what they did.
Next we were using final cut pro, although we were introduced to final cut pro in a previous lesson where we learnt how to patch stuff together, this was much harder because it was working from scratch and our own footage. at first it was very complicated getting everything imported and in the right place but soon me and my group learnt, I learnt how to get over footage from the camera to the programme, how to trim footage and fine cut, how to make shots fit in with each other and another skill that we learnt our self was how to get a sound track in our remake, after all the editing we were all very proud of the work and so was our teachers but they still pointed out stuff that we could improve, and we kept it in mind for next time.
Next we had a few lessons on just learning stuff like genre and sub genre’s, intertexuality and other students work. This was all so that we can have a better understanding and so that we think about our ideas. At this point I was starting to get used to blogging and started to blog a bit more.
Next our group had learnt how to make an opening in more detail this was done by remaking a thriller opening with given footage from ‘Arlington road’ here we learnt how to put the title sequence in and later Foley sound and how Foley sound works. We also learnt how to use sound track to put in our sound and also music. We all helped each other in every part.
When making room 333, everything that I had learnt went into action and our group came back with some of the best work we have done so far, we experimented with lighting and setting and although we were pushed for time we still improvised and got it covered. In this I acted which was a difference from what I normally do which is filming, I learnt a lot from it and saw how to use the way we act effectively to work well with editing and filming.
Right now as we are finishing our opening I am learning how to effectively use the effects and transitions in final cut pro.
Wednesday, 7 March 2012
Making of EXHIBIT A - Bathroom Cabinet Bloopers
Finishing the editing
 Final editing of the thriller, took a long time and a lot of hassle to cut it down.
 Making the final title in photoshop, worked very well.
 Putting everything back together including beginning sequence and end sequence
EXHIBIT A -Rough Cut Feedback

After watching our rough cut version of EXHIBIT A we realised one main problem which was it was way over three minutes. We have decided to cut it down also fine cut it because the opening of EXHIBIT A just dragged on and was getting quite tedious.

However, looking at the rough cut version we did find some shots that we really did like. The match cut shot of Baris heading towards the house which changes to him being watched from inside of the house worked really well, it also created tense.
We also thought the flashbacks looked really well. The first flashback of the man (Tufael) in the house and the other of the victim (Sabina) on the floor created tense also we get an insight of what happened during the course of the film.


After looking at the rough cut version we did
decide to take out the two shots with the clock as we thought it was unnecessary and adding extra time to the opening also it didn't fit with the whole scene and looked out of place.
Making of EXHIBIT A -Fake Blood
Tufael made fake blood at home using households products such as flour, milk, red food colouring green food colouring and water. We used this in our film and it worked out really well as it did look realistic.


Monday, 5 March 2012
Making of EXHIBIT A -Filming Part 2
We are getting our set ready to film are indoor scene.
props talk.
Making of EXHIBIT A - Filming Part 1
Here we are making our way to our location to start filming.
This is our first shot at filming our opening scene.
Thursday, 1 March 2012
Exhibit A - Rough Cut
Whilst editing the opening we realised that it went over five minutes. We managed to get it down to three minutes however, we are still going to try to get it down even shorter and make some of the scenes faster. Although we felt we had some good shots, we realised even after we cut some shots down, it still worked well. Our pace was also too slow, it seemed to drag on a bit, so by cutting down shots this also helped keep up a fast pace building tension film!
Monday, 27 February 2012
Making of EXHIBIT A- Chalk Body Dilemma
Before shooting the scene of the chalk body on the floor of EXHIBIT A we had a problem. The chalk we used didn't show on the floor.
After trying out the chalks we managed to find TALCUM POWDER around the house and decided to use that. Even though the drawing out the chalk body is a two minute job, for us it took long as we had to make a fine outline and cear up any excess powder.
OUR SOLUTION!!!

To get the outline of the body we first got Sabina to lay down on the floor. Baris went around outlining the body with talcum powder when Tufael went around making the outlines fine using a paper. After the outlining was finished Sabina had to get up carefully so that the lines didn't mess up.
Here are the videos showing the process.


OUR SOLUTION!!!
To get the outline of the body we first got Sabina to lay down on the floor. Baris went around outlining the body with talcum powder when Tufael went around making the outlines fine using a paper. After the outlining was finished Sabina had to get up carefully so that the lines didn't mess up.
Here are the videos showing the process.

Wednesday, 22 February 2012
from Donna
Hi Guys
Your photos and new blog design look great. Could you edit your photographs into an 'edited piece' in Final Cut. This will improve 'the look' of your blog. You are filming tomorrow, so I will get the equipment with you first thing.
Baris you are behind with your blogging, so could you attend workshop and catch up please.
see you then
Donna
Monday, 20 February 2012
Making of EXHIBIT A - Shots
These are some shots of us filming our thriller! Dont mind the plastic bag over our camera, it was raining and we improvised!


EXHIBIT A - Storyboard
This is our story board for our thriller. Planning out shot by shot helps us to stay organised and film what we need without wasting time! Also when it comes to editing we can easily put the clips in order. The story board also reminded us of the exact match cuts we would use.


Thursday, 16 February 2012
Different types of structure of a film opening
The three basic types of structures of a film opening that I have recognised are a narrative opening, a discrete title sequence and titles over a black screen.
Narrative opening: whereby the opening has titles running throughout.
A discrete title sequence is when the titles are shown but the action over powers, and so making it almost camouflaged.
Another style of opening is stylised editing, this is when the precision of the opening is immaculate, the titles will almost become one with the sound and action of the opening.
Panic Room
Enemy of the state
This is an example of a discrete opening. We are almost enticed or captured by the action behind the titles that we almost miss the big names that run across our screen such as "Will Smith".
The Taking of Pelham 123
This is an example of "stylised editing". The way in which the titles run through this intro is immaculate. Different fonts and sizes are used for the titles throughout, the titles match the music the sound and the action and almost become one with them. For example when the music is mysterious the title is bold and black and is slowly uncovered.
Narrative opening: whereby the opening has titles running throughout.
A discrete title sequence is when the titles are shown but the action over powers, and so making it almost camouflaged.
Another style of opening is stylised editing, this is when the precision of the opening is immaculate, the titles will almost become one with the sound and action of the opening.
Panic Room
I have chosen Panic Room to illustrate the film opening of narrative opening. In this intro we see the titles continuously running throughout and also the titles are not subtle, they are very bold and large in size and so hard to miss. They make the audience recognise and read the titles.
This is an example of a discrete opening. We are almost enticed or captured by the action behind the titles that we almost miss the big names that run across our screen such as "Will Smith".
The Taking of Pelham 123
This is an example of "stylised editing". The way in which the titles run through this intro is immaculate. Different fonts and sizes are used for the titles throughout, the titles match the music the sound and the action and almost become one with them. For example when the music is mysterious the title is bold and black and is slowly uncovered.
Saturday, 11 February 2012

what do crime scenes look like?
Tufael here, i done some research into what crime scenes actualy look like on google images and i also found out how our evidence cards should look like.


this is the first image that caught my attention mainly because its a lot like how our scenen is ment to look like. The lighting and body give a very strong atmosphere of mystery and dangour which we could use in our thriller.

I think this picture can help because the black and yellow tape on top is the exact same as the one we have for props.

layout of evidence cards

Here are some close ups on evidence cards. i will try to print some out the best i can, im also going to have to write some of the credits on the bottem of the cards just incase.
Subscribe to:
Posts (Atom)